Monday, 9 December 2013

Lucky Find - Cross Stitch

Geometrical Cross Stitch


Take a look at this treasure that I found in an OP Shop. Isn’t it amazing? The colour scheme is so playful and daring, the stitch perfect.  I have put it on my wall until I make a decision on what to do with it, embellish a bag, part of a cushion… or simply just decorate my wall as is? The piece is only 30x20 cm.
In the past I have embroidered on top of embroidery that I have found in second hand shops, but not this one, it is too special. Any ideas?
xo Sarah

Geometrical Cross Stitch
 

Thursday, 5 December 2013

White and Wholemeal Spelt - Daily Bread #4

Sour Dough Baking
The criss-cross pattern on this sour dough spelt bread looks so authentic "French bakery" - it happened all by itself, not my doing at all.

 
Baking bread is an amazing process, so intense for all of our senses: See the magic happen when you mix a few basic ingredients, smell the goodness when it bakes in your oven, taste the goodness when it is done, feel the texture and heaviness of healthy bread, hear your family's happy comments when they bite into it! Ok, that is a bit sought I know, but I really enjoy baking, it is kind of therapeutic for me. And I have found a way to manage both home baked and a job: by mixing the dough the night before and baking early morning, I can still get kids ready for school, myself off to work etc. So I do not mind being a "Spelt-Mum"; a term used in Denmark for well-to-do mums in a particular part of Copenhagen, that have gone on board the organic and home made in a crusade like way (or so the critics say). Except for the well-to-do, I think that "Spelt-Mum"actually depicts me to some degree. I value homemade and organics highly and will go out of my way to get my hands on these things especially when I see people being passionate about what they produce.
What do you like about baking?
 
 
Sour Dough Baking
 
I had it in a proving basket overnight. I turned it out on the table to prove a bit longer and it started to crack up making the interesting pattern.


Sour Dough Baking

Tasted good too!

xo Sarah

Tuesday, 3 December 2013

Christmas Pixies and Calendar Candle

Scandinavian Christmas in Australia
 Little Christmas pixie sweeping and his wife in a pillar box hat. My youngest boy made these two cuties last year when he was 6 years old.

 
When Decembers hits we clear out a shelf and set up our Christmas pixie village. It is not really linked to the Christmas Story as such, but it is fun and very creative. My boys and I have made most of the things out of recycled materials such as milk cartons, bottles, buttons etc. and of course artificial snow. When we unpacked it all from last year, some of the pieces had fallen apart or were squashed. That is not a bad thing; it only means we need to create some new Christmas items for our village. Here is what we have and let’s see what the boys come up with in the coming weeks?


Scandinavian Christmas in Australia
We put artificial candles into the houses so they light up at night.

 
Scandinavian Christmas in Australia
Skiing snow man is the latest addition.


Scandinavian Christmas in Australia
 

Another Danish tradition that we love is the Calendar Candle (kalenderlys). It is a countdown to Christmas Eve and we light it every night, as we watch an episode of the Danish Christmas Calendar for Children, all sent to us from the children’s Grandmother – Thank you Herdis!
xo Sarah


Monday, 2 December 2013

First of December and Snow in Australia

Australian Christmas
Frangipani Snow - it has a beautiful scent.


It is December and my family and I have begun all the traditional Danish Christmas preparations - now under warmer conditions. On the first of December as we were putting up Christmas decorations I looked out the window and could almost convince myself that I saw snow – blue skies and 25 degrees… yeah right! I took this photo and if you concentrate really hard and squint your eyes a bit it almost looks like patches of snow; a white cover of Frangipani flowers on the deck around the pool. December makes me really homesick; longing for my family in Denmark and the cold!
 
ox Sarah

Tuesday, 26 November 2013

Mini Loaves with Pumpkin Seed and Cracked Wheat - Daily Bread #3


Sour Dough Baking

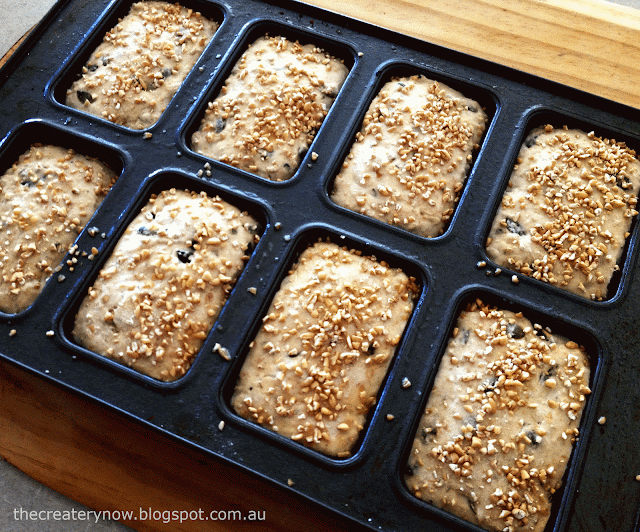
Mini loaves for school lunches

Here are some healthy mini loaves waiting to be baked. It is sour dough with pepita seed and cracked wheat. I made the dough last night and put them into a tin and in the fridge where they have been sitting overnight doing their thing. Got up at 5.30am, sun is up at 4.30am as it is summer and we have no daylight saving in Queensland... and I have a child that wakes as soon as the slightest light shines through the blackout curtains. So they were baked well in time for school.


Sour Dough Baking
Sour dough with pepita and cracked wheat - and the baked loaves

Pepita seed are a great source of zinc, magnesium and other trace minerals. I use them in lots of bread recipes to add a bit of health. I put a whole mini loaf in both boys’ lunch boxes amongst other things and they can gnaw off them during their breaks.


Healthy Bread
Food for humans and teddy bears
 
They are also really cute sliced and made into tiny little sandwiches for kids and teddies. Having a family tea party with teddies is lots of fun for kids and is occasionally a favourite activity here in this house.


Sour Dough Mini Loaves with Pumpkin Seed and Cracked Wheat


8-12 mini loaves, depending to the size of tin you use.


Ingredients

5 dl cold water

¼ tsp dried yeast or 10 g fresh

1 dl sourdough starter

150 g cracked wheat

100 g pumpkin seeds/pepita

150 g wholemeal flour

650 g wheat flour

15 g of sea salt


Day 1:


1.       Soak the cracked wheat in cold water overnight. Once soaked, drain water away.


2.      Pour the 5 dl cold water into a bowl, add yeast and sourdough and stir until dissolved. Add the salt and wholemeal flour and most of the wheat flour; just hold a little of the flour back while you mix until you are sure the dough can take more flour. Before you add the seeds - now is the time to take a bit of the dough and put into your jar of sour dough starter for next time. Add your soaked cracked wheat and the pumpkin seeds. Now you need to stir and knead until the dough does not stick to the sides of the bowl anymore. If you have a mixer this is easy – if you do it by hand it takes some kneading... but don’t fret, it is actually quite therapeutic… or at least it helps to think so. Keep going, your dough needs to be very elastic, which means when you pinch it and pull, you should be able to pull a fair bit; it thinning to almost see-through before it snaps. If not, knead 10 more minutes.


3.      Brush your tin lightly with oil and place you dough in it. Brush oil on a piece of cling film and cover your tin. Refrigerate for 12 hours.


Day 2:

1.       Take your tin out of the fridge and let it sit on the kitchen bench to “wake up” – prove a bit longer. I usually place mine in a sunny spot to help it along. This can be anything from maybe half an hour to say 6 hours depending on how strong your sour dough starter is. Once you are happy with the state of your risen dough, put the oven to 200 degrees. Place an empty baking tin in the bottom of the oven and when you put the breads in the oven, throw a cup of cold water in the hot tin. The steam gives the bread that crispy bubbly crust. Enjoy!


Related Posts Plugin for WordPress, Blogger...