Tuesday, 26 November 2013

Mini Loaves with Pumpkin Seed and Cracked Wheat - Daily Bread #3


Sour Dough Baking

Mini loaves for school lunches

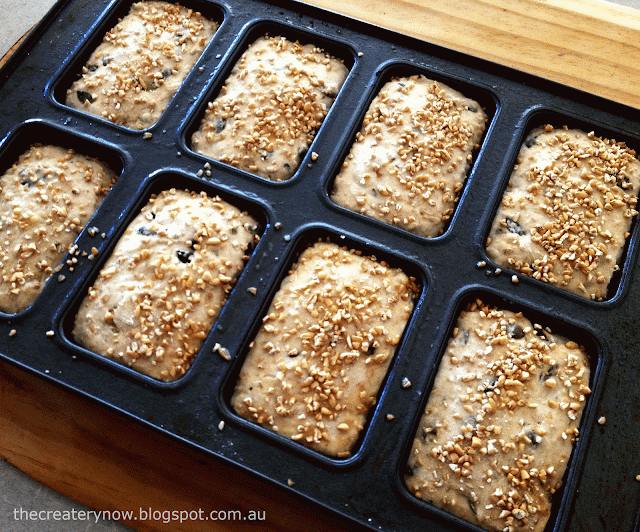
Here are some healthy mini loaves waiting to be baked. It is sour dough with pepita seed and cracked wheat. I made the dough last night and put them into a tin and in the fridge where they have been sitting overnight doing their thing. Got up at 5.30am, sun is up at 4.30am as it is summer and we have no daylight saving in Queensland... and I have a child that wakes as soon as the slightest light shines through the blackout curtains. So they were baked well in time for school.


Sour Dough Baking
Sour dough with pepita and cracked wheat - and the baked loaves

Pepita seed are a great source of zinc, magnesium and other trace minerals. I use them in lots of bread recipes to add a bit of health. I put a whole mini loaf in both boys’ lunch boxes amongst other things and they can gnaw off them during their breaks.


Healthy Bread
Food for humans and teddy bears
 
They are also really cute sliced and made into tiny little sandwiches for kids and teddies. Having a family tea party with teddies is lots of fun for kids and is occasionally a favourite activity here in this house.


Sour Dough Mini Loaves with Pumpkin Seed and Cracked Wheat


8-12 mini loaves, depending to the size of tin you use.


Ingredients

5 dl cold water

¼ tsp dried yeast or 10 g fresh

1 dl sourdough starter

150 g cracked wheat

100 g pumpkin seeds/pepita

150 g wholemeal flour

650 g wheat flour

15 g of sea salt


Day 1:


1.       Soak the cracked wheat in cold water overnight. Once soaked, drain water away.


2.      Pour the 5 dl cold water into a bowl, add yeast and sourdough and stir until dissolved. Add the salt and wholemeal flour and most of the wheat flour; just hold a little of the flour back while you mix until you are sure the dough can take more flour. Before you add the seeds - now is the time to take a bit of the dough and put into your jar of sour dough starter for next time. Add your soaked cracked wheat and the pumpkin seeds. Now you need to stir and knead until the dough does not stick to the sides of the bowl anymore. If you have a mixer this is easy – if you do it by hand it takes some kneading... but don’t fret, it is actually quite therapeutic… or at least it helps to think so. Keep going, your dough needs to be very elastic, which means when you pinch it and pull, you should be able to pull a fair bit; it thinning to almost see-through before it snaps. If not, knead 10 more minutes.


3.      Brush your tin lightly with oil and place you dough in it. Brush oil on a piece of cling film and cover your tin. Refrigerate for 12 hours.


Day 2:

1.       Take your tin out of the fridge and let it sit on the kitchen bench to “wake up” – prove a bit longer. I usually place mine in a sunny spot to help it along. This can be anything from maybe half an hour to say 6 hours depending on how strong your sour dough starter is. Once you are happy with the state of your risen dough, put the oven to 200 degrees. Place an empty baking tin in the bottom of the oven and when you put the breads in the oven, throw a cup of cold water in the hot tin. The steam gives the bread that crispy bubbly crust. Enjoy!


Saturday, 23 November 2013

Walking on Redcliffe Peninsula

Walking on Redcliffe Peninsula 

What's around the corner
What's around the corner?


I took some time out from work and my chores the other day and went for a walk at Woody Point - on the Redcliffe Peninsula. In the busyness of everyday family life and work it is easy to forget your natural surroundings and what they can actually do for mental wellbeing. It is beautiful here by the sea. How lucky am I to live in a place like this!! Calm blue sea, blue skies and warm sunshine. Have you discovered this place yet?


Walking on Redcliffe Peninsula


I recently read in the local paper that a local politician for Redcliffe wanted to remove the restrictions of the Moreton Bay Marine Park… quote: ”so families can go fishing and get sand between their toes”. Now that might sound like a pleasant idea, but how about keeping the marine park now that it is well established and it provides a safe haven for fish, turtles and dugongs. AND families can get sand between their toes on the other kilometres and kilometres of other beaches that we have here; and then just leave this little corner for marine life alone? How many turtles was it that was found dead here after the recent powerboat races (which were held outside the  marine park) – 4?
I say: Please keep the marine park!
xo Sarah


Walking on Redcliffe Peninsula


Rusty ship wreck at Woody Point
My boys favourite place - exploring around the wreck
Walking at Woody Point


Walking on Redcliffe Peninsula
Exotic Palms
 
Walking on Redcliffe Peninsula
Stunning pink tipped bougainvillea

Sunday, 17 November 2013

Breakfast Rolls with Polenta - Daily Bread #2

Baking Breakfast Rolls
 

Breakfast Rolls with Polenta

 
Baking Breakfast Rolls


Weekend breakfast. These rolls have a fantastic colour - from polenta and a bit of turmeric! I sprinkled half with poppy seeds and the contrast; blue seeds - yellow roll, was actually pleasing to the eye as well as the palate.

xo Sarah

Monday, 11 November 2013

Sour Dough Bread with Zucchini - Daily Bread #1

Daily Bread

 Sour Dough with Zucchini


I bake a lot. I love freshly baked goods especially with a bit of health thrown in and also knowing exactly what I am feeding my family. Most of the breads I make are of the very robust kind - sour dough, grain, seeds and wholemeal flours. But as I also do have a sweet tooth sometimes a cakes is in the mix. I use recipes, but I also often just add and mix to that particular dough what I feel like on the day. When I did the post for Bread with Buckwheat it took forever editing the pictures and organising the setup, so until I have a fantastic camera like Nora's I might just stick with simple pictures for these Daily Bread posts. They are meant for inspiration - and I will add recipes later.

Daily Bread
 My mum makes this delicious Crab Apple Jelly - beside the taste the colour is so vibrant and beautiful.
 The Crab apples are grown in my parents garden in Denmark. When my brother came for a visit to Australia two weeks ago, his suitcase contained 7 jars of my mum's homemade jams - heaven! Thanks mum! 
 
Daily Bread
Grated Zucchini was added to the dough. This makes the bread lovely and moist on the inside. 


Sour Dough Bread with Grated Zucchini

 
1 large loaf or 2 small ones:
Ingredients
500 ml of water
2 tbsp oil e.g. canola or vegetable
1 tbsp sea salt
1 tbsp of honey
100 ml sour dough starter (or if you do not have this then use 1 tsp dried yeast, or 20 g of fresh yeast)

1/4 tsp dried yeast, additional to your sour dough starter.
650 g of plain wheat flour
200 g of wholemeal spelt or other wholemeal flour (I used rye flour)
1 zucchini (approx. 250 g) coarsely grated
 
Day 1
Mix water, oil, salt, honey and sour dough starter in your bowl. Mix in both flours a little at a time. This dough is very soft, so there is no kneading here, just give it a really good stir/mix with your spoon. I use a machine, but using a wooden spoon is no problem.
Now if you like, before you add the zucchini take some of the dough and save for your next sour dough starter. Then add the zucchini.
Scrape the dough into you bread tins, one large one or two small ones depending on what size bread you want. Press down and even out the dough with a spatula (if you put cold water on the spatula it does not stick to the dough).
Spray or brush some oil on some cling film and cover your tins. The oil ensures that you can remove the film easily without the dough sticking to it. Leave to rise overnight in the fridge or if it is not too hot then on the kitchen bench.
Day 2
If you had the dough in the fridge, it might not have rise fully. Take it out and let it sit on the kitchen bench and “wake up” for a few hours before baking. No matter how you do it, the most important thing is that it has risen by about a third or more of its size. Recipes often state a time for the “proving” of the dough, but often I find that the dough needs much longer what the recipe says. It is better not to hurry this, wait another hour if your bread has not risen high enough.
Turn on your oven on high, 225 degrees, put an empty bread tin at the bottom of the oven to heat up. Once you put your loaves in the oven, throw ½ cup water into the empty tin and close the oven door quickly. The steam will give you that nice crispy bubbly crust on your bread. After about 10 minutes; turn down the heat to 200 degrees. Bake for approx. 30 min. for two small loaves or 45 min for one large one.
All ovens are different, so always check whether it looks nice and brown and done. Sometimes I remove the tins and give them 5 minutes more in the oven to crisp up. Tip: you will know if your bread is done by knocking on the bottom side of it - if it sounds hollow then it is done. Bon appetite!
xo Sarah

 
Sour Dough Baking


 PS. do not leave your loaves on the kitchen bench if it is a warm night! I should know better living in Australia, but the fridge was full and I was tired! When I went to bed all looked fine - when I got up in the morning... dough explosion!!


Tuesday, 5 November 2013

Cooking School

This is the crispy fish we cooked in oil
Crispy Fish waiting for the tamarind sauce
 
 
Gear for Spirit House Cooking School


My dear brother Thomas is visiting us from Denmark. My dear husband said my brother and I could go away and spend some quality time together; he would look after kids – yeah! No need to think twice. Thomas and I went up the coast, stayed in my friend’s lovely house in the forest at Yandina; we booked cooking school (and a spa experience).

The cooking school was held at Spirit House, a Thai restaurant located in beautiful lush rainforest surroundings at Yandina. They have lots of different cooking classes to choose from, we just hopped on the “Essential Thai” one for that day and it was great! The restaurant has been cooking their famously delicious Thai cuisine for 21 years; they have published several cookbooks and sell their own brand of sauces and condiments plus have this cooking school – respect!

We had the best day! From 9.30 til 2pm, we were occupied in a very professional cooking environment, a newly renovated beautiful and generous kitchen with a very competent chef handing out the know-how of Thai ingredients and the 4 essential tastes of Thai cooking: salt, sweet, sour, heat.

From the moment we stepped into the kitchen, the fragrant scent were all around us and the fresh fruit and vegetables laid out ready for chopping were displayed beautifully.

By the time we finally got to sit down and enjoy the meal we had cooked, the build-up for that first mouthful was immense – but we were not disappointed, the flavours were fantastic; Tom Yum, the chicken green curry (Thomas did a great job of beating the crap out of the green curry past in the mortar), the totally crispy fish and salad of pawpaw and caramelised pork – all delicious and best of all we had a great time making it.
xo Sarah

Busy cooking Thai food


Colourful Ingredients


The lush rainforest garden at Spirit House


Friday, 1 November 2013

Quilts on Show in Brisbane

Quilt by Pamela Patterson
Quilt by Pamela Patterson, Tasmania. An interpretation on what "Free" means to the her as the artist.


I went to a quilt and sewing show at the Brisbane Exhibition Centre a few weekends ago. It is the first time I have gone, so I was quite curious to whether I would find it interesting. I did. There were some amazing works. The detail, the skill, the imagination that was put into some of the displayed quilts was quite amazing. I am a sewer/dressmaker and I have never really ventured into quilting, but I felt inspired afterwards, so maybe one day when I have some free time on my hands I might give it a go. Or maybe next time my mum, who is a keen quilter, comes to visit me she could teach me a few quilting tricks. I would never have the patience or skill for anything as complicated as the ones I have photographed and posted here. But I might give a simple one a go… after all my other projects. Take a look at my favourite pick from the exhibition:

Quilt by Ailsa Koloi
 The title of this quilt by Ailsa Koloi is Whirligig and you can see why. It is an amazing combination of colourful off-cuts used so precisely to create this whirl wind.
Quilt by Ailsa Koloi
The perfection and detail blows you away!
 
 
Quilt made by Jan Phillips
Quilt by Jan Phillips, title: Splash Pineapple Log Cabin. Made with Japanese fabric scraps.


Quilt Made by Marlene King
The theme for this quilt made by Marlene King was "In the Heavens" and she named the quilt "Black Holes and the Milky Way". It is much darker in real life and reflects the magic of space very well I thought.
 
 
Quilt made by Jean Green
Quilt made by Jean Green and named "Star Crazy". Cute and colourful star quilt - no two stars are alike!


Quilt by Gail Chalker
Quilt by Gail Chalker, "You Can Never Have Too Many Circles". Intricate work, the quilt is huge and the work just cutting the circles let alone putting all together into this beautiful quilt!


Quilt made by Barbara McLennan, NSW

Quilt made by Barbara McLennan, NSW
Such a happy and poetic quilt over the theme: "The Best Things in Life are Free", named "Sunset over the Ocean", made by Barbara McLennan, NSW.

I enjoyed the show - hope you did too?
xo Sarah

Related Posts Plugin for WordPress, Blogger...